10 Steps to Pipetting like a Pro!

Pipettes are an essential laboratory tool used to dispense liquids. Whilst pipettes can be used simply as a liquid transfer device where the actual volume of liquid dispensed is not important, more often they are required to dispense accurate and precise volumes of solutions which are likely to be critical to experimental procedures. There are numerous pipette manufacturers and many pipette types that are designed for all applications, with volumes ranging from 0.1 µL to 100 mL or more. You can get repeater pipettes if you are dispensing lots of aliquots of the sample solution and multi-channel pipettes which are great for dispensing samples into plates; especially useful for high-throughput assays. In this guide we will highlight 10 important factors that will help you improve your pipetting technique and ensure accurate, reproducible results!
Identifying your pipettes
If working to Good Laboratory Practice (GLP) or Good Clinical Practice (GCP) regulations then all of your pipettes should have a unique identifier, typically this will include the area or assay they are used for and a number. All pipette information should be held centrally and include a list of all pipettes in circulation, the make and model, the serial number and the unique identifiers you have assigned.
All details of the pipette metrology, its service history, any faults and repairs should also be stored here as a regulatory authority may wish to view this information during an inspection.
Calibrate your pipettes
Pipettes should be calibrated regularly in accordance with the guidelines you are working to. For effective calibration, use their lowest and highest volumes, which will be stipulated by the manufacturer. This calibration can be done with water weighings using a 4 place balance; for volumes below 10 µL a 5 place balance is required, or it can be done using a radioactive solution. Once the calibration measurements have been performed the accuracy and precision should be calculated. Typically the accuracy should be within 3% of expected weight or radioactive counts and the precision within 2.5%. Always check the laboratory SOP’s for exact acceptance criteria.
If a pipette fails metrology, there are a number of things that can be done. Firstly, check that you are using the correct tip for the pipette and that it has been put on the pipette correctly. Ensure that the tip is not damaged or leaking and that there are no air bubbles present when you pipette your water/radioactive standard. If calibration still fails after these checks have been carried out, get a second person to perform the calibration, to ensure no operator error. If the pipette still fails, it can be taken apart (follow manufacturer’s instructions) and cleaned with water, or pipette grease added to improve movement. If the pipette still fails calibration it is advisable to send it to the manufacturer or service provider for repair.
Would you prefer to read this as a PDF?
DOWNLOAD HERE
Which pipette is best for a given volume?
The accuracy of variable volume pipettes is greatest at the maximum volume and it is therefore important that the correct pipette is selected for each application. It is common practice to only use a volume range of 20–100% of the pipette’s max capacity, meaning you are never using a pipette at the lowest volume that it can go down to (usually 10%) – this limits the risk of inaccuracy associated with using a pipette at its lower limits. Ideally, you want to select a pipette where the volume you’re pipetting is 50–100% of the pipette’s range.
Pipette tips
Make sure you select the correct pipette tip for your chosen pipette. Most pipette tips can be supplied loose in bags or set up in racks for easier/more convenient use. Racked tips can be supplied sterile and non-sterile and some will stipulate, for example, RNAse free for specific applications. Pick the tips most suitable for you application – bagged tips are cheaper and sterile cost more than non-sterile! Ensure that the pipette tip you use is compatible with the make and model of the pipette you are using.
When using an air displacement pipette for samples, for samples that must remain sterile (e.g. plasma and cell cultures), or that are sensitive to cross contamination (such as next generations sequencing library preparation) you can use tips with filters built in to prevent liquids aspirating into the pipette barrel. This prevents the pipette becoming contaminated with your biological sample and transferring to other samples.
Ideally you want to change your pipette tips between samples to avoid contamination, however if you are preparing something like a calibration line where you are going up in concentration you can use the same tip, in this instance it’s advisable to prime the tip with each solution as you move up the concentration range. If you are moving down concentration range or if you are pipetting samples of unknown concentration then always change your tip between samples to prevent any contamination.
Air displacement pipettes
On air displacement pipettes the plunger is depressed to both draw up and dispense liquid. Operation consists of depressing the plunger to the first stop position whilst the pipette is held in air. The pipette tip is then submerged in the liquid to be pipetted and the plunger released slowly, drawing the liquid into the pipette tip. The liquid then be dispensed into the receiving vessel by depressing the plunger to the first stop position and then the second stop position (also called the ‘blow out’ position) to expel all of the liquid from the pipette tip. The volume of air displaced is equivalent to the volume of liquid aspirated.
Positive displacement pipettes
Positive-displacement pipettes, work like a syringe. There is no air cushion between the disposable piston and the sample. With no air cushion to expand or contract, the aspiration force remains constant, unaffected by the physical properties of the sample. This allows the positive-displacement operator to pipette very viscous or high density samples, such as glycerol and blood.
Pipetting technique
Once you’ve selected the most appropriate pipette for your sample and ensured the correct pipette tip is on, you’re good to go.
- Firstly prime/pre-wet the tip 2–3 times with the solution/sample you wish to transfer.
- Immerse the tip into the liquid you wish to pipette – this should be sufficiently below the meniscus such that you don’t aspirate air but not so far that the liquid level comes above the top of the pipette tip.
- Leave the tip in the liquid for a couple of seconds after aspiration to ensure the tip has been filled completely.
- During aspiration, try to hold the pipette vertically in the liquid and in the center of the vessel rather than touching the sides. If any droplets of liquid are on the side of the pipette tip these can be removed using the edge of the vessel or by wiping with a lint free cloth – ensure you don’t wipe the opening of the tip as this could cause some loss of sample.
- When dispensing the liquid, hold the pipette at a slight tilt rather than vertical and dispense against the side of the receiving vessel. Watch the sample leave the pipette tip and when you remove the tip from the vessel ensure there are no droplets on the end of the tip – if there are, touch the tip against the side of the receiving vessel again so that the droplet transfers.
- Try to aspirate and dispense at a slow and consistent speed between samples as this will be more likely to give consistent and reproducible results.
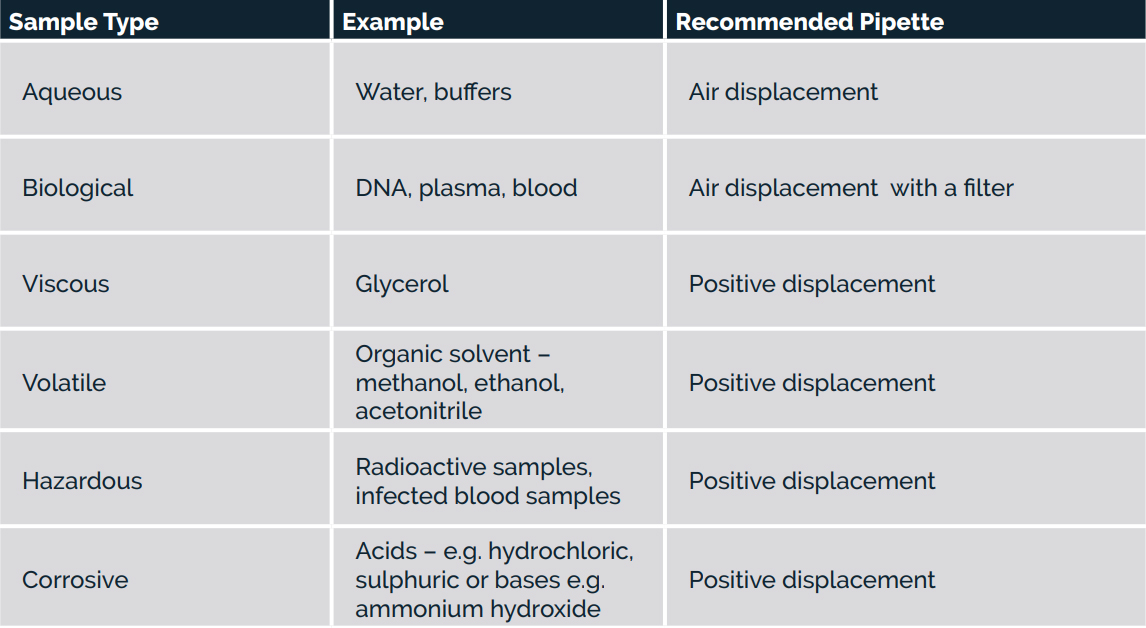
Which pipette is best for my sample?
Regardless of the volume you require, the nature of the sample directly impacts precision and accuracy. Air-displacement pipettes will be better for aqueous liquids whereas positive displacement pipettes should be used for problem liquids.
Looking after your pipettes
Pipettes should be cleaned with a soft cloth and water if they get any sample on them. They can also be sprayed with IMS or ethanol to clean them prior to use in a sterile environment or prior to service. You must not use organic solvents to clean the internal parts of a pipette as this can cause damage or corrosion. It’s best to store pipettes vertically when not in use; on a pipette stand or carousel. If a pipette is dropped or taken apart it should always be calibrated again before use.
If working in a lab where a variety of different procedures take place it is a good idea to have separate sets of pipettes for the different applications. For example, having one set that is solely used for radioactive work eliminates the risk of other pipettes and other areas of the lab becoming contaminated with radioactivity. Having separate sets for PCR or cell culture work also reduces the risk of cross-contamination or introducing any infections into your samples.
Unexpected results
Sometimes even when we do everything correctly our samples don’t behave as we’d like and we don’t get the results we are expecting. This could be due to the properties of the compounds in the solutions we are pipetting, for example compounds can stick to the pipette tips or the sample vessels. There are some things you can do to try and eliminate this. With regards to vessels, you can trial different plastics (e.g. low bind materials), glass and salinized glass. With pipette tips you can prime/wet-the tip multiple times to ensure that the compound will stick during the prime thus resulting in the correct amount being pipetted when transferring your sample. You could also use a low retention tip designed to repel the sample you are pipetting thus preventing adhesion to the tip. Most manufacturers supply a variant of these for their pipettes.


