

8 Steps to Successful SMRT Sequencing

Single Molecule, Real-Time (SMRT) Sequencing… I can remember first reading about this technology in the mid to late 2000s. It boasted a huge shift in our approach to sequencing – moving away from methods that had up to that point been validated and entrenched in labs across the world. In this guide, I hope to provide some insight into SMRT Sequencing and the tips and tricks that will ensure success in the template prep and sample preparation for use on this sequencing platform.
When SMRT Sequencing was released it wasn’t just the zero-mode waveguide (ZMW) or the phospholinked nucleotides that went against normal sequencing convention. The template prep also stepped outside conventional thinking. The radical step was the removal of PCR amplification. Amplification was almost always used to increase the number of DNA molecules to be sequenced. The reliance on PCR amplification had at least two downsides: (1) the introduction of error from the lower fidelity polymerase used in PCR and (2) limits to the DNA size, since PCR is generally only reliable up to about 8 kb. Due to the elimination of PCR amplification, the approach to template prep in SMRT Sequencing was labeled as “difficult” or “DNA hungry” since it required a lot of starting material. In the early days it was DNA hungry, requiring 50 mg or more to sequence 3 Gb+ genome. Improvements in the technology and template prep protocols have reduced the input requirements to 10 mg or less, depending on the size of the genome.
Let’s look at the template prep and what the advantages of the SMRT template are for long read projects.
Would you prefer to read this as a PDF?
DOWNLOAD HERE
QC the sample
The template prep for SMRT Sequencing starts like all NGS methods, with a quality control step to check the integrity of the DNA. For SMRT Sequencing of Whole Genome assemblies, we like to have DNA that is 20 kb and larger in average size. The larger the DNA the better, as you can always shear larger DNA to the desired size (see below).
Tips for success:
In order to be successful using SMRT Sequencing, it is extremely important to QC your input DNA. Contaminated or damaged samples, along with inaccurate quantitation and sizing, can lead to downstream sequencing problems. Since the template prep process does not use amplification, input DNA quality will be directly reflected in your sequencing results.
First, you need to quantitate your DNA using a fluorometric assay. We recommend the Qubit or PicoGreen. Dyes used in these assays bind selectively to DNA making quantitation more sensitive than UV absorbance.
Using a spectrophotometric assay can help to identify contamination. For samples with a concentration >10-20 ng/ul, we recommend an OD260/80 of 1.8 to 2.0. A ratio lower than this may be the result of a contaminant that absorbs at 280nm or less.
Assaying high-molecular weight DNA is critically important for constructing large-insert libraries. Since fragments >20 kb tend to comigrate and appear as a large band at the top of a conventional electrophoresis gel, a Field-Inversion Gel Electrophoresis system should be used. You will need to evaluate the quality of DNA, as well as to determine the sizes of sheared DNA and SMRTbell templates.
Shear the sample
Once the quality is confirmed, the next step is to shear your DNA into size-appropriate fragments. The size really depends on the DNA and what its QC looked like. For this example, let’s assume it is high molecular weight DNA that is averaging 100 kb in length. The next step would be to shear this sample down a bit to a working range of 30 kb-50 kb for library prep. There are numerous methods to use for shearing; I prefer the G-tube from Covaris for less than 20 kb sized fragments and the Megaruptor from Diagenode for 20 kb+ fragments.
End repair the samples
Sheared fragments then go through an end repair step where an enzymatic cocktail blunts the ends of the fragments.
Ligation
We do a ligation step in which we attach the hairpin adapter to each end of the DNA fragment. This step turns the DNA fragment into a closed construct that when opened by the DNA polymerase during sequencing looks like a big circle. This structure allows for the polymerase to loop around numerous times depending on the size of the DNA fragment (see below).
Exonuclease
After ligation, clean up steps using PacBio AMPure beads and an exonuclease treatment are administered to remove any fragments that don’t have the hairpin adapters added. A diagram of the desired structure of a hairpin-ligated template is shown in Figure 1 below. This type of sample prep allows SMRT Sequencing to target very large fragments in what is called a single-pass read (a read in which the polymerase only sequences one side of the fragment). Alternatively, we can target smaller DNA fragments (10 kb or less) to obtain highly accurate sequence data since, due to the circular nature of the template, the polymerase is able to go around the strand multiple times to generate multiple reads of both strands of the DNA fragment. The sample prep accepts a variety of sample types and sizes, allows for size selection options to enrich for the longest inserts and allows multiplexing/barcoding to increase sample numbers.

Figure 1: Diagram of a SMRTbell template
Annealing of primer
Once the sample prep is completed it is now time to sequence this DNA library. The first part of sequencing is to create a location on the template where the polymerase can bind and initiate polymerization. We do this by annealing a sequencing primer to an engineered primer binding site in the single-stranded region of the hairpin adapters.
Polymerase binding
Next, we add the sequencing polymerase which attaches to the annealed primer sequence. After a few clean up steps, the sample is ready to load onto the Sequel instrument to obtain sequence data.
Tips for Success:
It is important to remember that you are working with a sensitive enzyme. All steps once the polymerase has been added should be done on ice, including the PacBio AMPure bead clean-up steps. Leave the AMPure bead magnet in ice while collecting the beads. Work quickly but efficiently to ensure that the polymerase stays on ice.
Sequencing
The sample is loaded onto a SMRT Cell containing 1 million individual ZMWs with the objective of getting a single polymerase-bound template into as many ZMWs as possible. Once loaded, fluorescently labelled nucleotides are added to the SMRT Cell. Each nucleotide has its own unique fluorescent label that emits a characteristic pulse of light that indicates which nucleotide is being incorporated by the polymerase. These pulses of light are recorded by the Sequel instrument in a movie and sent to a base calling step that turns the recorded pulses of light into base calls for the DNA molecule. (See Figure 2 below.) Because this is a processive synthesis reaction, it continues until the movie collection time, specified by the user, ends or the polymerization reaction stops for some reason (e.g., the polymerase falls off of the template or is damaged during the reaction). The current system allows you to sequence from 30 min to 1200 min movies (0.5 hrs to 20 hrs). Once the instrument is started, you are able to walk away as it will keep sequencing for the user specified amount of time.
In addition to accurate long reads, PacBio Sequencing can also provide epigenetic information for each base in a DNA fragment. If a base has a modification, such as an additional methyl group, like 6mA, the incorporation of the complementary base by the polymerase gives a different light pulse shape in the movie than for a non-modified base, with each different type of modification giving a different light pulse shape. In this way we are able to provide epigenetic information from the native DNA being sequenced.
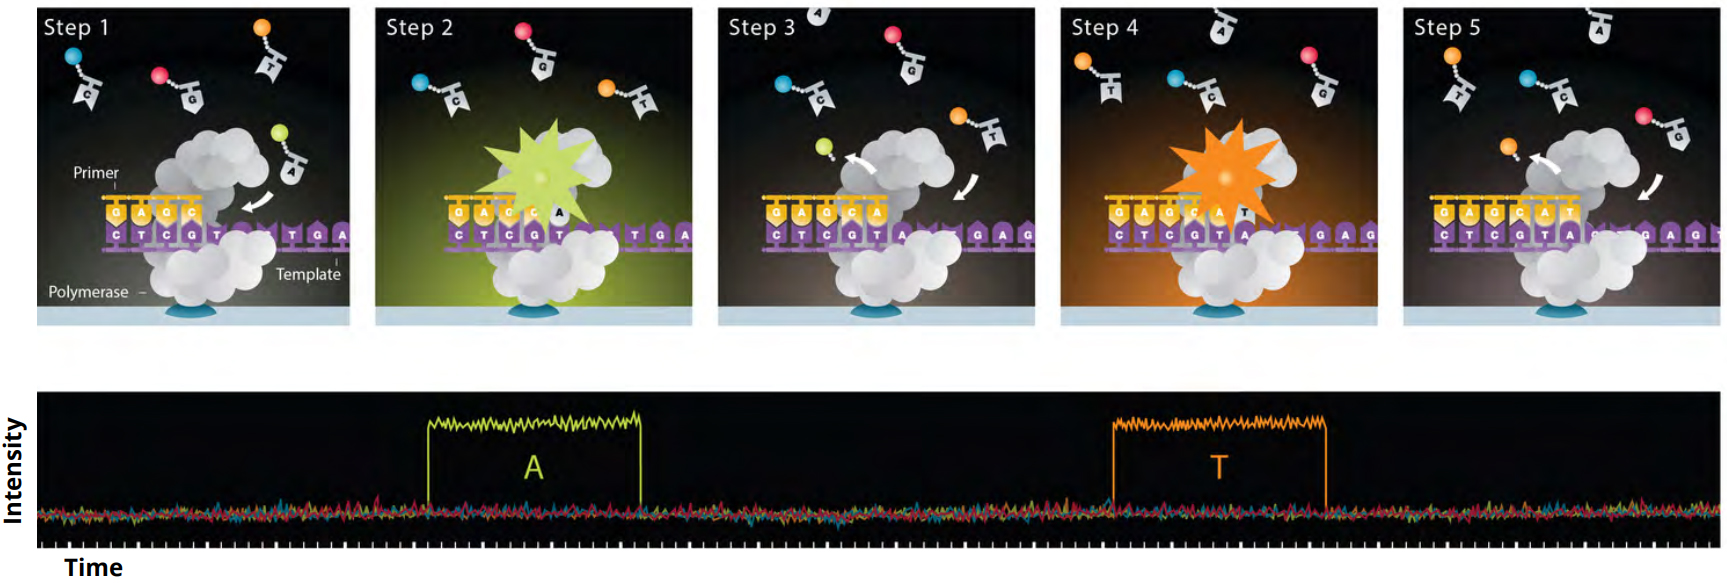
Figure 2: Steps in SMRT Sequencing. Step 1 – Labeled nucleotide complementary to the first base in the template enters the polymerase active site. Step 2 – Labeled nucleotide emits a fluorescent signal while held by the polymerase during incorporation of the base (the label is removed as it is incorporated). This signal is recorded as a light pulse (lower panel) and given an identity based on the characteristic of the fluorescent signal (an “A” in this case). Steps 3 to 5 – The free label diffuses away and the polymerase moves to the second base in the template, where the process is repeated (a “T” is recorded for the second base).
SMRT Analysis:
SMRT Analysis is our separate stand-alone analysis program that is used to analyze the sequence data. This is open source software is available to anyone who wants to download and install it. There are numerous analysis methods available through SMRT Analysis, including whole genome assembly, amplicon assembly, Iso-Seq analysis, barcoding/multiplexing and many more. The SMRT Analysis software suite also includes advanced data visualization and data mining tools.


